Loading... <div class="tip inlineBlock share"> 此文参考众多大佬,进行总结,文章内容较长,先来个目录 </div> > 目录 > > 1. 安装面板 > 2. 安装olaindex魔改版 > 3. 绑定Onedrive国际版 > 4. 安装aria2 > 5. aria2下载+自动上传脚本 > 6. 绑定Onedrive世纪互联版 之前一直用PR+onedrive国际版当下载机,平时在看个动漫、电视剧啥的挺方便的。但是国际版那个速度实在是慢死了,无法忍受的慢啊。此外PR这个机子垃圾的实在垃圾,而且这套东西过一段时间会出现占用空间非常大的情况,可能是有时候上传后没有正确删除。 想到手里还有个ultravps的250g大盘鸡,也想顺便入个世纪互联,所以就打算写下这个教程。之前的时候安装的时候也留下教程,挺可惜的,当时也遇见了不少坑。 # 安装面板 从前一直习惯用lnmp,军哥一直在默默的维护。但是不得不说,一个人的力量始终抵不过一个团队,宝塔面板越来越大,作为低级运维和普通小白,bt真的非常适合。 所以,适应市场规律才能持久,我真的是害怕军哥大佬哪天突然不再维护了。 ``` Centos安装命令: yum install -y wget && wget -O install.sh http://download.bt.cn/install/install_6.0.sh && sh install.sh Ubuntu/Deepin安装命令: wget -O install.sh http://download.bt.cn/install/install-ubuntu_6.0.sh && sudo bash install.sh Debian安装命令: wget -O install.sh http://download.bt.cn/install/install-ubuntu_6.0.sh && bash install.sh Fedora安装命令: wget -O install.sh http://download.bt.cn/install/install_6.0.sh && bash install.sh ``` 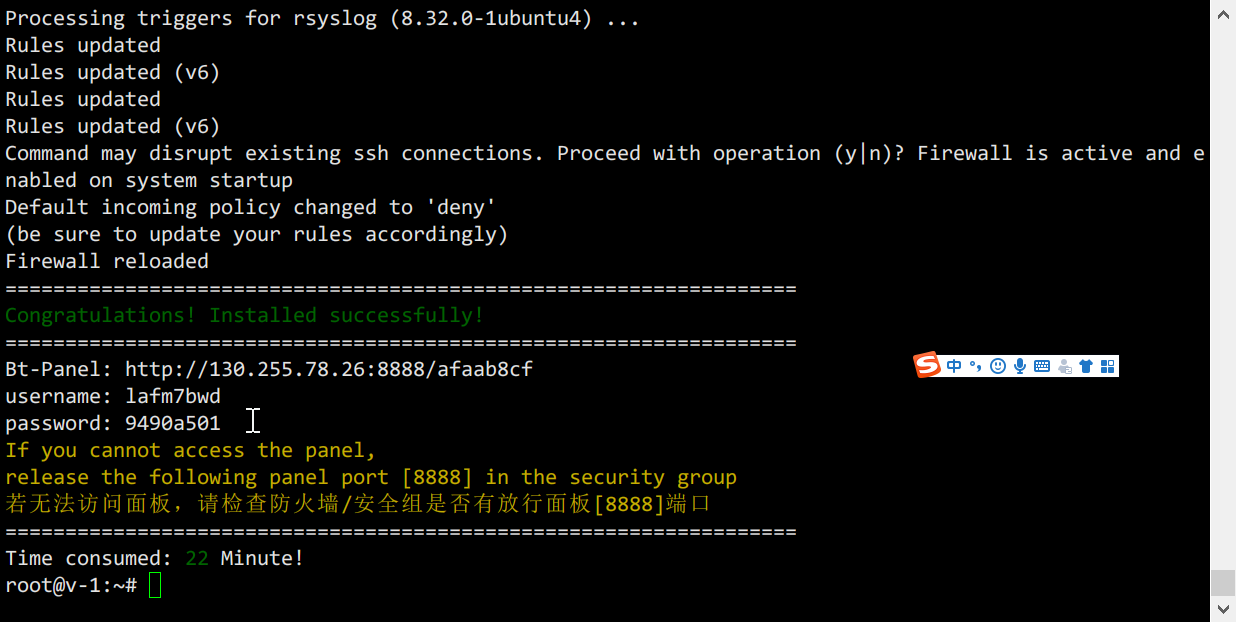 ## 安装php以及相关插件 OLAINDEX是基于php的,所以要安装php等插件。 `PHP` 环境选择 `7.1` 以上,这里选择 `7.2`。之后安装PHP扩展,安装 `fileinfo `扩展并附带安装 `opcache 扩展`以加速php运行,也可以安装 redis 和memcached 扩展。 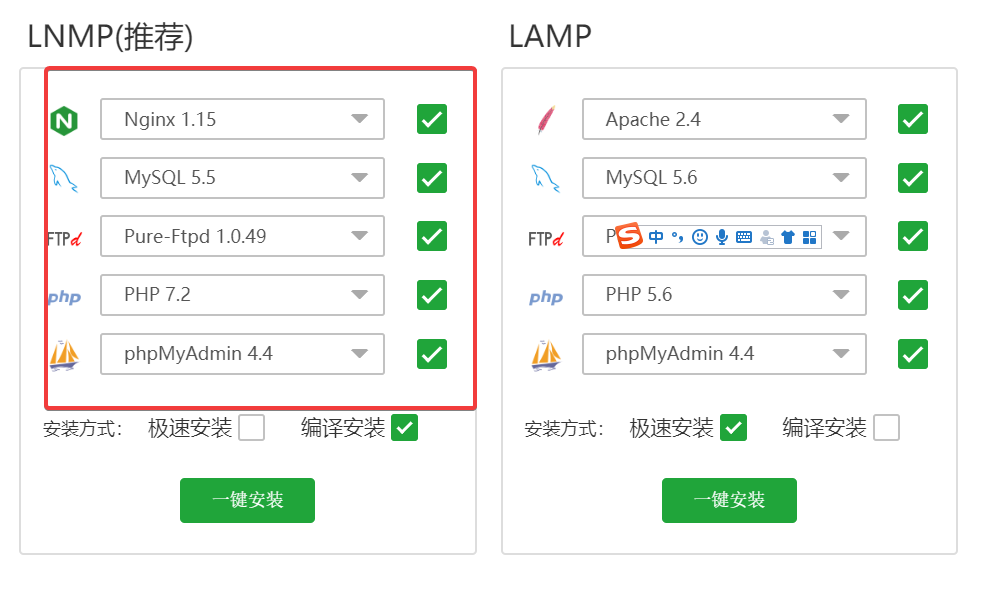 最后还关闭PHP的几个禁用函数:`exec 、putenv 、 shell_exec 、 proc_open 、proc_get_status` 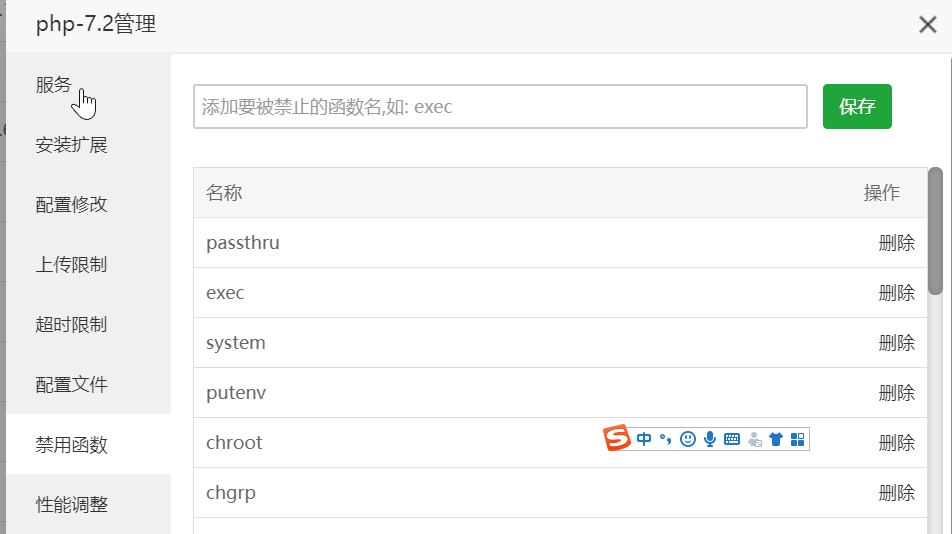 # OLAINDEX魔改版 ## 配置域名 首先需要一个域名,并且把这个域名指向你的vps。 ## 安装olaindex 以下命令建议一步一步执行,中间有些简单的可以按照代码块执行。 ``` cd web目录 git clone https://github.com/YukiCoco/OLAINDEX-Magic.git tmp mv tmp/.git . rm -rf tmp git reset --hard cp database/database.sample.sqlite database/database.sqlite # 数据库文件 composer install -vvv # 这里确保已成功安装 composer ,如果报权限问题,建议给予用户完整权限。 chmod -R 777 storage chmod -R 777 database chown -R www:www * # 此处 www 根据服务器具体用户组而定 php artisan od:install # 此处绑定域名需根据实际域名谨慎填写(包含http/https) # 安装完成后,不要忘记配置 nginx ,将域名指向应用目录的 public 下,参考下面nginx配置。 ``` 这一系列安装过程比较负载,要一条一条处理。宝塔已经默认自带了composer,一般没什么问题。 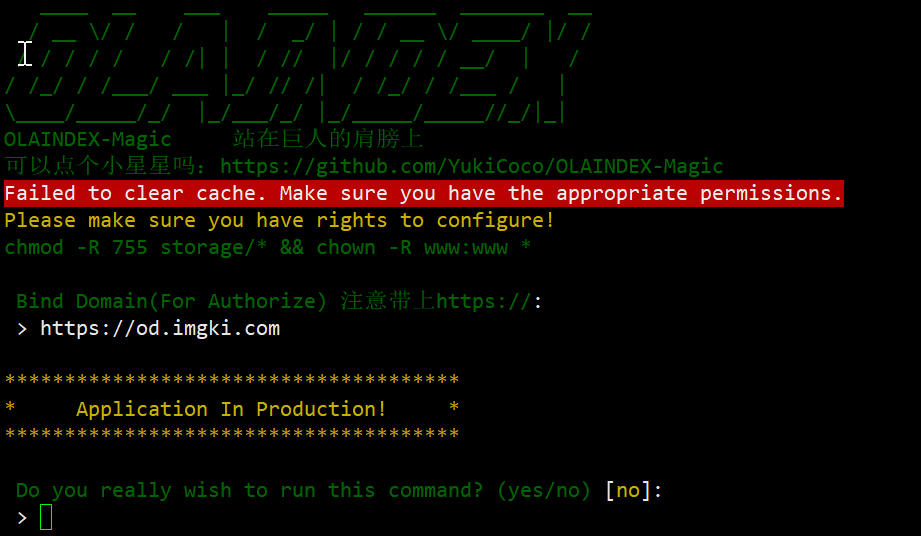 这样就是安装完毕了。 ## 新建主机 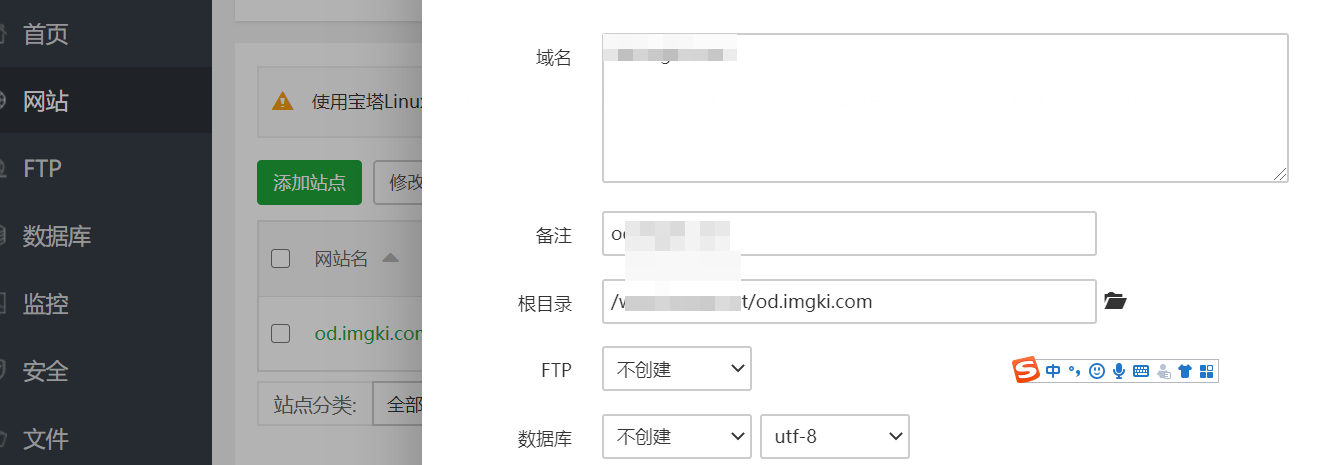 ### 目录指向 需要把网站的运行目录指向public文件夹,同时防跨站必须关掉。 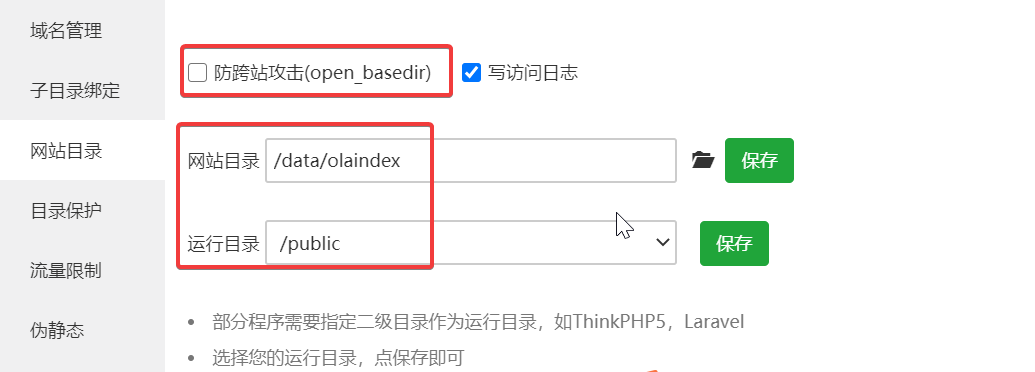 ### 配置伪静态laravel5 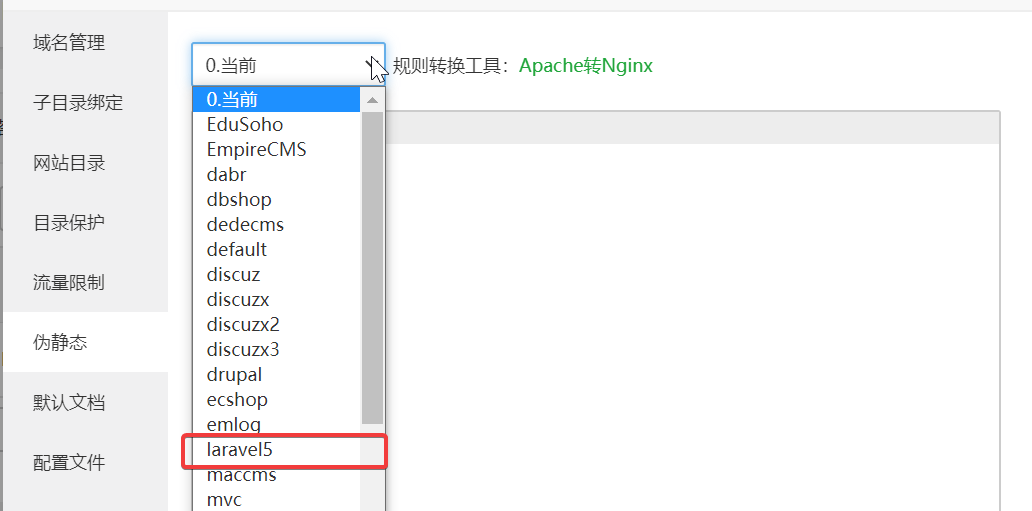 之后注释掉nginx配置中的部分,防止图片404 <div class="panel panel-default collapse-panel box-shadow-wrap-lg"><div class="panel-heading panel-collapse" data-toggle="collapse" data-target="#collapse-38d95149bd36dda14d28cce82474b9f492" aria-expanded="true"><div class="accordion-toggle"><span style="">注释掉部分内容</span> <i class="pull-right fontello icon-fw fontello-angle-right"></i> </div> </div> <div class="panel-body collapse-panel-body"> <div id="collapse-38d95149bd36dda14d28cce82474b9f492" class="collapse collapse-content"><p></p> ``` location ~ .*\.(gif|jpg|jpeg|png|bmp|swf)$ { expires 30d; error_log off; access_log off; } location ~ .*\.(js|css)?$ { expires 12h; error_log off; access_log off; } ``` <p></p></div></div></div> ### 申请SSL 用宝塔自带的ssl非常方面,嗖的一下就好了。 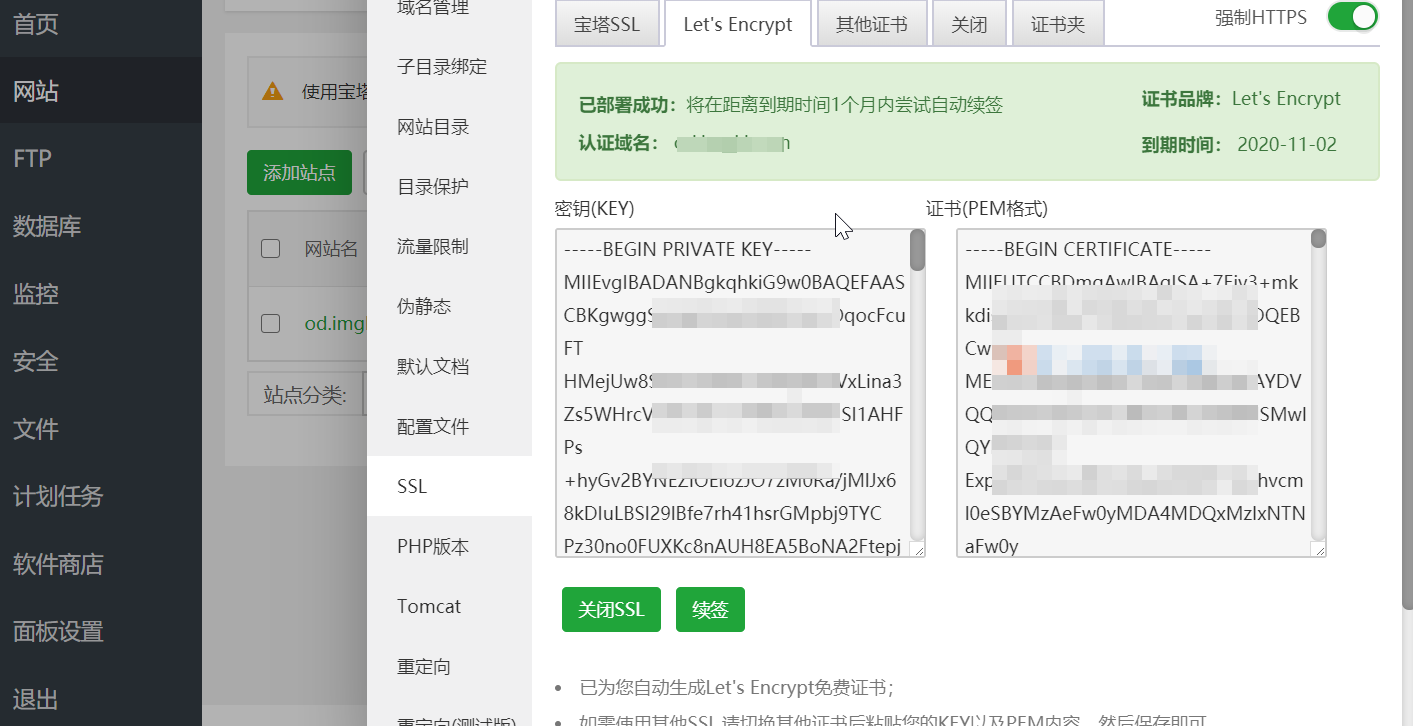 # 绑定Onedrive国际版 登陆olaindex后,先点击申请API(这里没有截图),之后会调整到微软的路径,一步点击,最终会给你secret和appid。 注意:检查自己申请的地址,是http还是https,如果不是,请改为https。 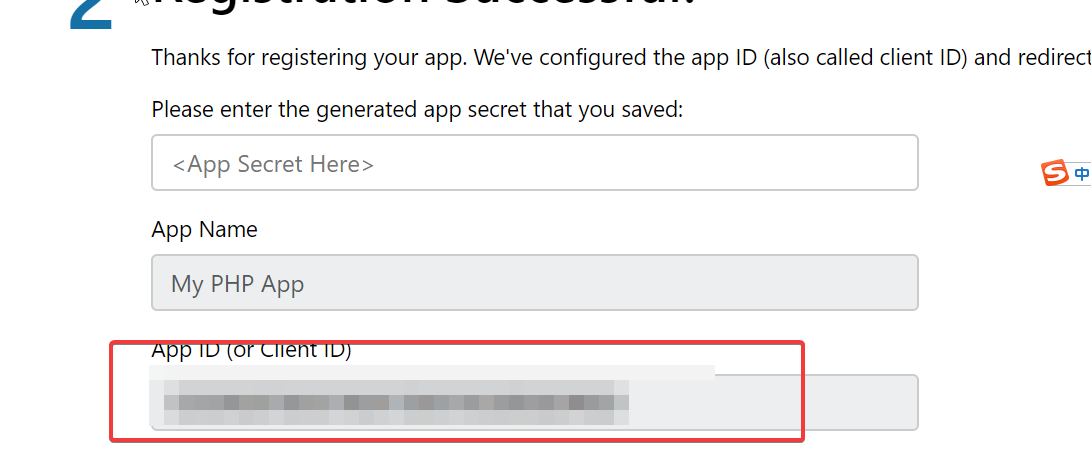之后把两串字符复制进去,注意保存好自己的应用ID和密码,别让别人知道。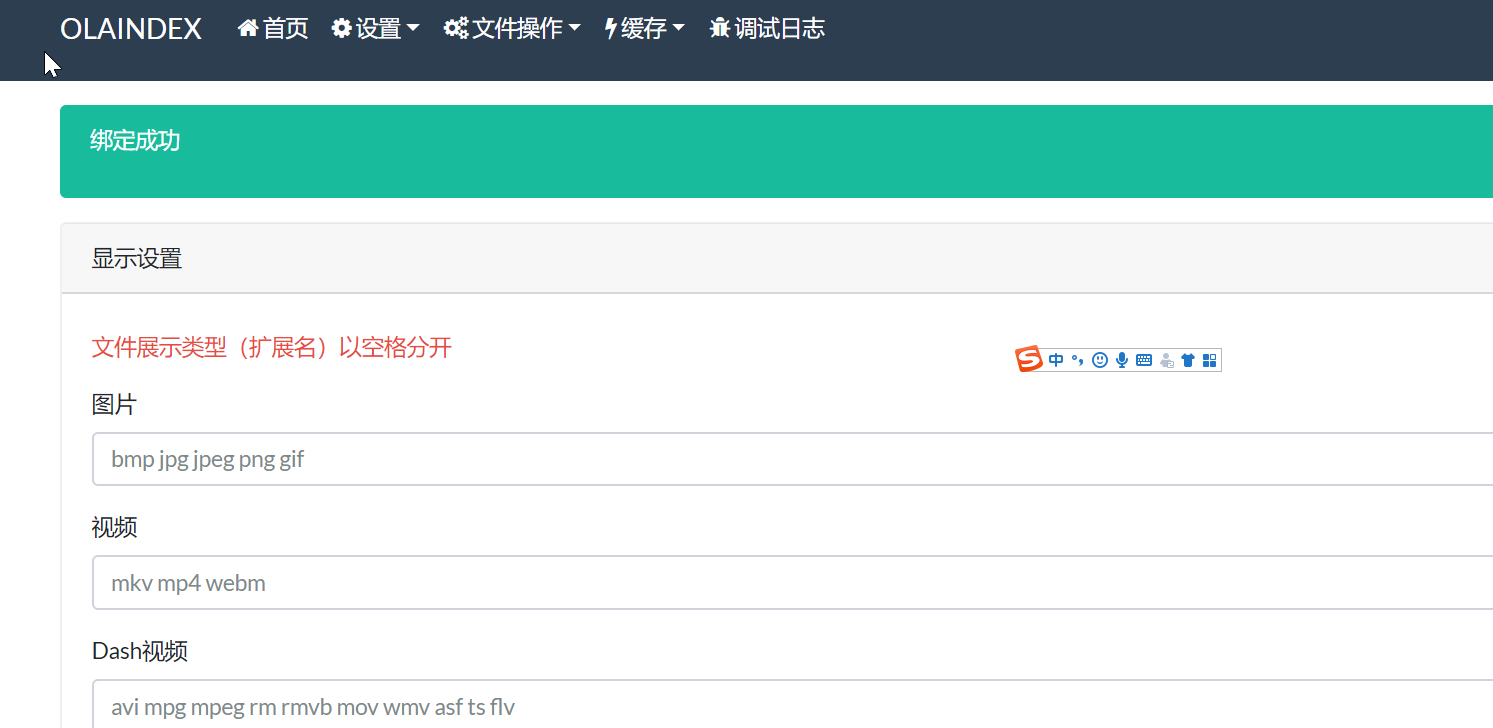 # 安装aira2 ``` wget -N --no-check-certificate https://www.moerats.com/usr/shell/Aria2/aria2.sh && chmod +x aria2.sh && bash aria2.sh ``` 安装完成后,如果我们想修改密码、下载文件位置、端口的话,可以使用命令bash aria2.sh,再选择修改配置即可,这里建议使用该脚本配置自动更新BT-Tracker服务器,对下载BT有加成。 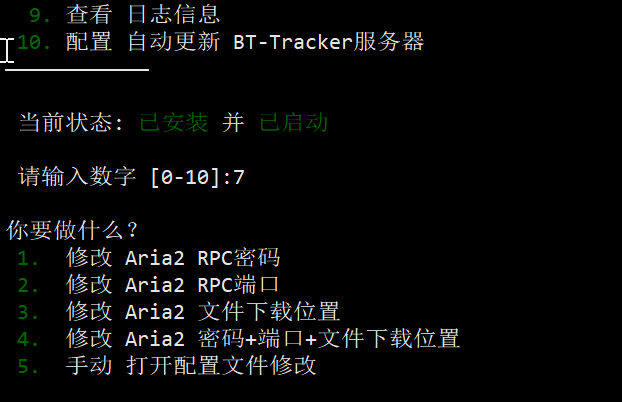 用脚本可以配置aria2的桉树,非常方便。 # 配置Aria2自动上传 前期有很多关于aria上传的方案,之前使用过几个,最后发现Onedriveuploader这个还是比较稳定好用的。 [https://github.com/MoeClub/OneList/tree/master/OneDriveUploader]() > 支持 国际版, 个人版(家庭版), 中国版(世纪互联). > 支持上传文件和文件夹到指定目录,并保持上传前的目录结构. > 支持命令参数使用, 方便外部程序调用. > 支持自定义上传分块大小. > 支持多线程上传(多文件同时上传). > 支持根据文件大小动态调整重试次数 > 支持跳过网盘中已存在的同名文件. ## 安装 ``` #64位系统下载 wget https://raw.githubusercontent.com/MoeClub/OneList/master/OneDriveUploader/amd64/linux/OneDriveUploader -P /usr/local/bin/ #32位系统下载 wget https://raw.githubusercontent.com/MoeClub/OneList/master/OneDriveUploader/i386/linux/OneDriveUploader -P /usr/local/bin/ #arm架构下载 wget https://raw.githubusercontent.com/MoeClub/OneList/master/OneDriveUploader/arm/linux/OneDriveUploader -P /usr/local/bin/ #给予权限 chmod +x /usr/local/bin/OneDriveUploader ``` ## 授权 #### 国际版, 个人版(家庭版) [https://login.microsoftonline.com/common/oauth2/v2.0/authorize?client_id=78d4dc35-7e46-42c6-9023-2d39314433a5&response_type=code&redirect_uri=http://localhost/onedrive-login&response_mode=query&scope=offline_access%20User.Read%20Files.ReadWrite.All](https://login.microsoftonline.com/common/oauth2/v2.0/authorize?client_id=78d4dc35-7e46-42c6-9023-2d39314433a5&response_type=code&redirect_uri=http://localhost/onedrive-login&response_mode=query&scope=offline_access%20User.Read%20Files.ReadWrite.All) #### 中国版(世纪互联) [https://login.chinacloudapi.cn/common/oauth2/v2.0/authorize?client_id=dfe36e60-6133-48cf-869f-4d15b8354769&response_type=code&redirect_uri=http://localhost/onedrive-login&response_mode=query&scope=offline_access%20User.Read%20Files.ReadWrite.All](https://login.chinacloudapi.cn/common/oauth2/v2.0/authorize?client_id=dfe36e60-6133-48cf-869f-4d15b8354769&response_type=code&redirect_uri=http://localhost/onedrive-login&response_mode=query&scope=offline_access%20User.Read%20Files.ReadWrite.All) 授权后会获取一个 `localhost`开头打不开的链接,这里复制好整个链接地址,包括 `localhost`。 ## 初始化配置文件 ``` # 国际版 OneDriveUploader -a "url" # 个人版(家庭版) OneDriveUploader -ms -a "url" # 中国版(世纪互联) OneDriveUploader -cn -a "url" # 在浏览器地址栏中获取以 http://loaclhost 开头的整个url内容 # 将获取的完整url内容替换命令中的 url 三个字母 # 每次产生的 url 只能用一次, 重试请重新获取 url # 此操作将会自动初始化的配置文件 # 提示 Init config file: '/path/to/auth.json' 则成功 ``` 之后把刚才那个 `localhost`开头的url填入 `OneDriveUploader -a "url",`输入到vps中执行,看下图。提示 `Init config file: '/path/to/auth.json'`则表示成功了。   <div class="tip inlineBlock warning"> 具体的使用配置、示例见官方doc </div> [https://github.com/MoeClub/OneList/tree/master/OneDriveUploader]() ## Aria2自动上传 前面安装了Aria2,通过Aria2下载到vps后,在上传到onedrive上,因此还需要一个上传脚本。 自动上传脚本如下 ``` #!/bin/bash GID="$1"; FileNum="$2"; File="$3"; MaxSize="15728640"; Thread="3"; #默认3线程,自行修改,服务器配置不好的话,不建议太多 Block="20"; #默认分块20m,自行修改 RemoteDIR=""; #上传到Onedrive的路径,默认为根目录,如果要上传到MOERATS目录,""里面请填成MOERATS LocalDIR="/www/download/"; #Aria2下载目录,记得最后面加上/ Uploader="/usr/local/bin/OneDriveUploader"; #上传的程序完整路径,默认为本文安装的目录 Config="/root/auth.json"; #初始化生成的配置auth.json绝对路径,参考第3步骤生成的路径 if [[ -z $(echo "$FileNum" |grep -o '[0-9]*' |head -n1) ]]; then FileNum='0'; fi if [[ "$FileNum" -le '0' ]]; then exit 0; fi if [[ "$#" != '3' ]]; then exit 0; fi function LoadFile(){ if [[ ! -e "${Uploader}" ]]; then return; fi IFS_BAK=$IFS IFS=$'\n' tmpFile="$(echo "${File/#$LocalDIR}" |cut -f1 -d'/')" FileLoad="${LocalDIR}${tmpFile}" if [[ ! -e "${FileLoad}" ]]; then return; fi ItemSize=$(du -s "${FileLoad}" |cut -f1 |grep -o '[0-9]*' |head -n1) if [[ -z "$ItemSize" ]]; then return; fi if [[ "$ItemSize" -ge "$MaxSize" ]]; then echo -ne "\033[33m${FileLoad} \033[0mtoo large to spik.\n"; return; fi ${Uploader} -c "${Config}" -t "${Thread}" -b "${Block}" -s "${FileLoad}" -r "${RemoteDIR}" -skip if [[ $? == '0' ]]; then rm -rf "${FileLoad}"; fi IFS=$IFS_BAK } LoadFile; ``` 编辑好上传脚本后,可以检测下脚本编码是否正确。如果无任何输出,则正确 ``` bash /root/upload.sh #检测脚本 ``` #### 修改脚本 过一段时间后,脚本上传的文章乱七八糟的,全在根目录上,我希望能够按照时间分文件夹。把这一句稍微改一下: ``` RemoteDIR=""; #改为 RemoteDIR="Media/$(date "+%Y%m%d")"; ``` 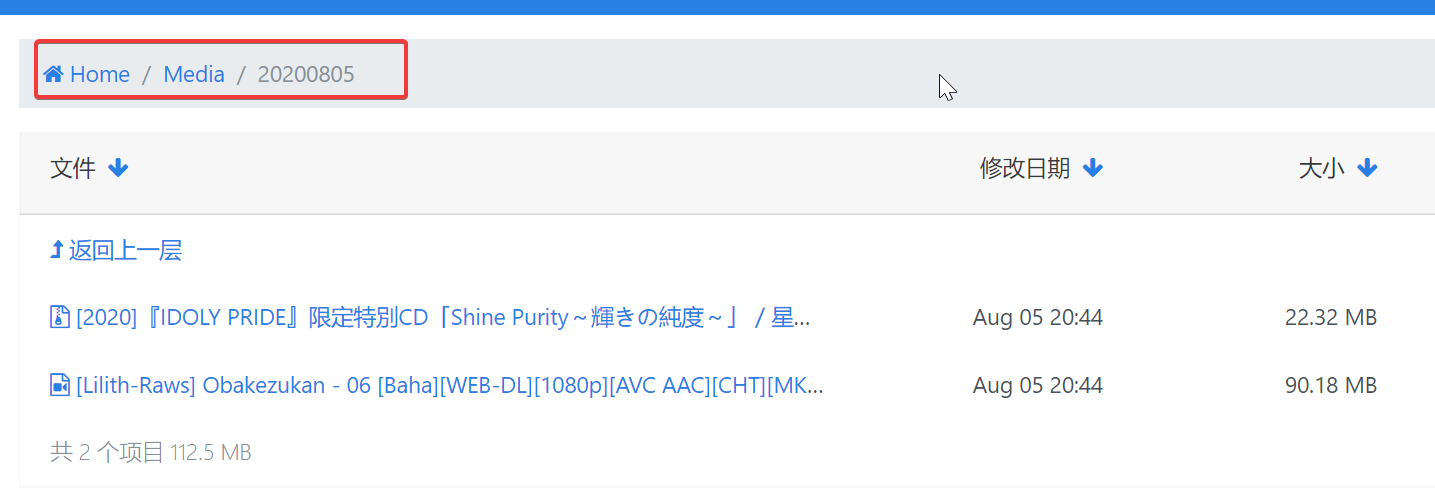 ### 添加自动上传 然后再到 `Aria2`配置文件中加上一行 `on-download-complete=/root/rcloneupload.sh`即可,后面为脚本的路径。最后重启 `Aria2`生效。 最后再给脚本赋予权限 `chmod +x upload.sh` 之后就可以用Aria2NG下载,自动上传到onedrive上。  # 目前发现存在的问题 1. 文件下载上传后,需要一段时间更新缓存才能在olaindex中显示,但是以前onedrive没有这类问题。 2. aria2下载的时候有可能卡死,特别是卡在100%之后,无法进一步触发上传脚本。 # 绑定世纪互联 实际互联API的地址和国际版不一样,下面给出世纪互联版的绑定方法,过程有点复杂,请认真看。 登陆[我的仪表板 - Microsoft Azure 由世纪互联运营](https://portal.azure.cn/) 依次点击【Azure Active Directory】选择【应用注册】,再点击【新应用注册】并打开 [应用注册](https://portal.azure.cn/#blade/Microsoft_AAD_IAM/ActiveDirectoryMenuBlade/RegisteredApps) 然后依次选择 `+新注册` 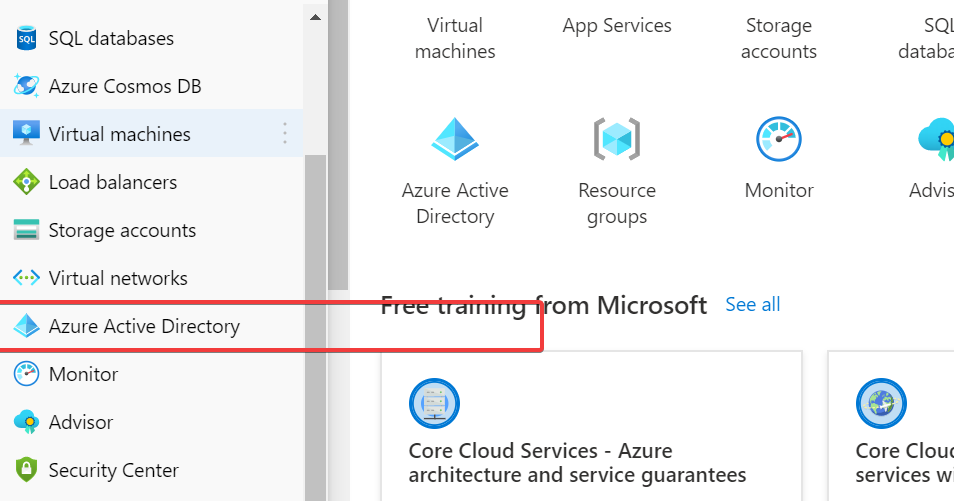 随意起一个名字,这里无所谓,后期可以改,例如 `olaindex` 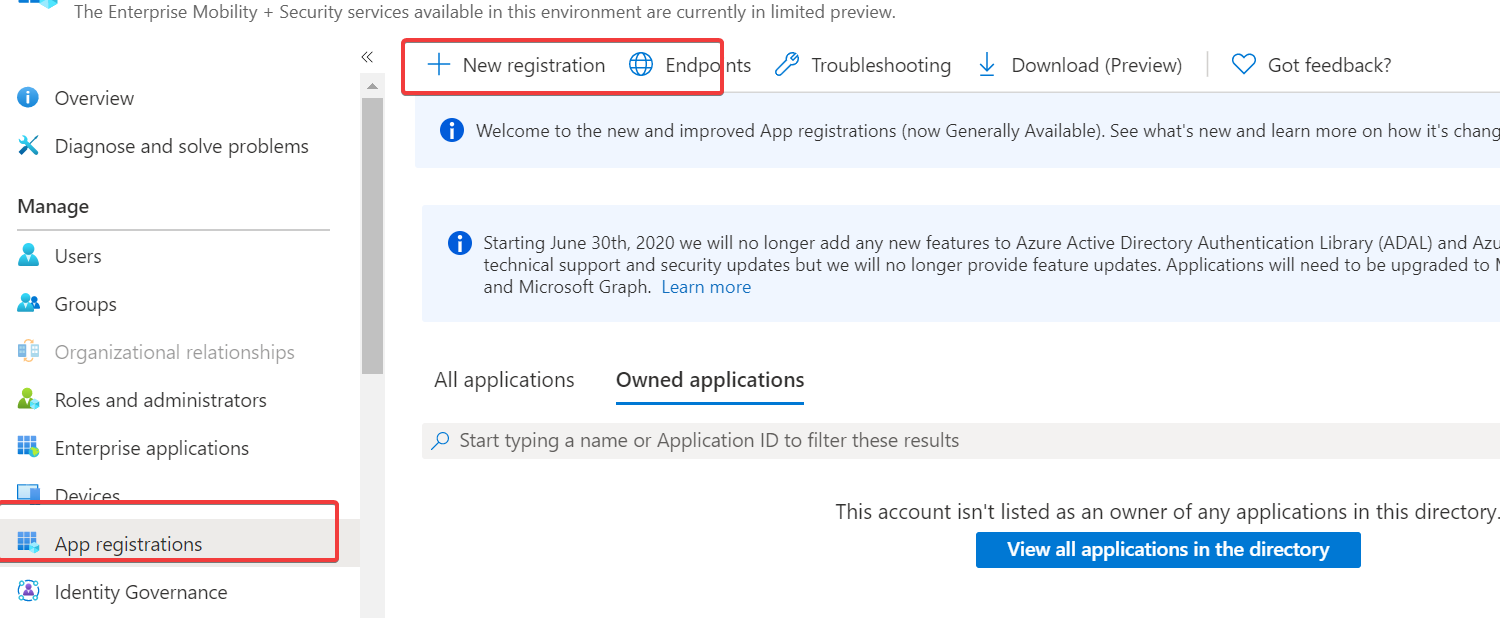 这里的回调地址填写你自己的olainde,比如:http://od.xxxx.com/oauth 格式要注意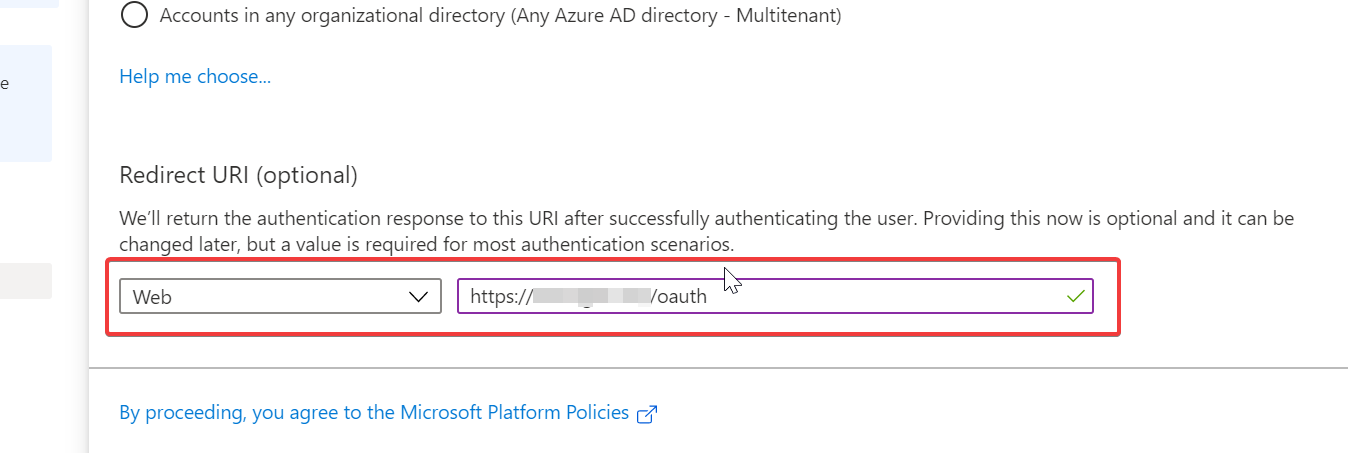 之后再API权限里面增加权限,然后选择 Sharepoint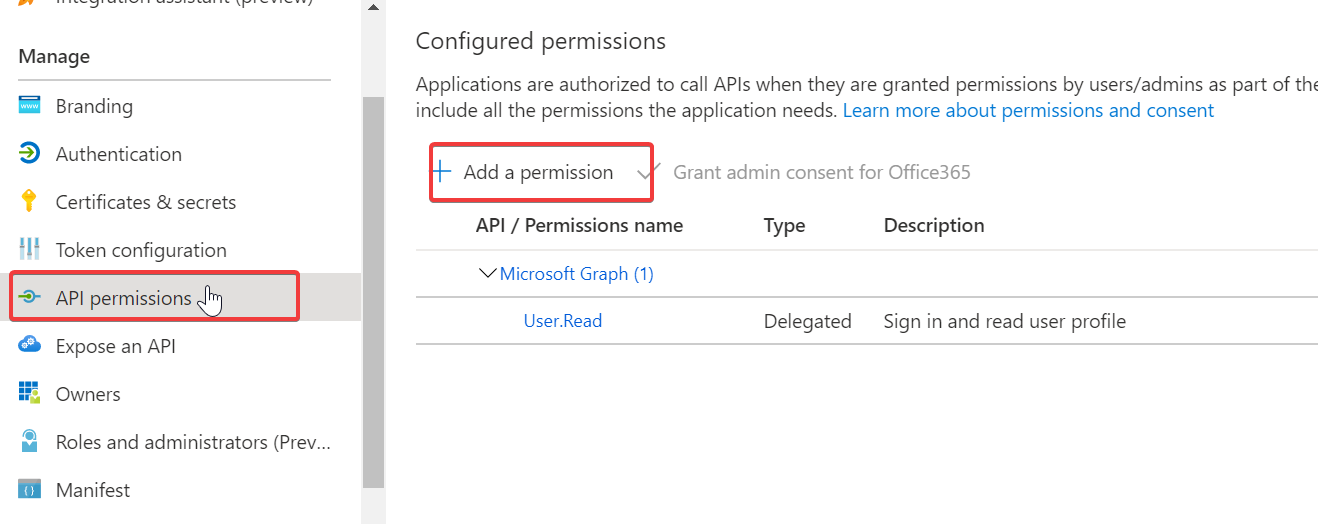 之后点击Graph  然后选择委托的权限 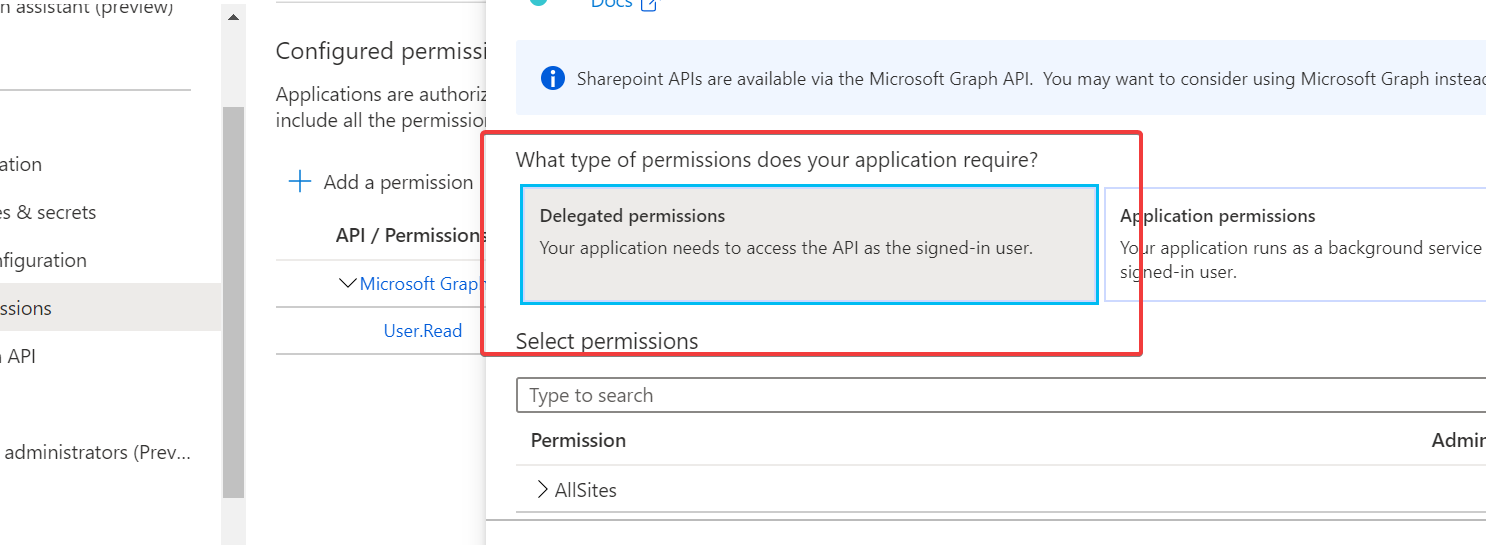 只有增加一下几个权限。 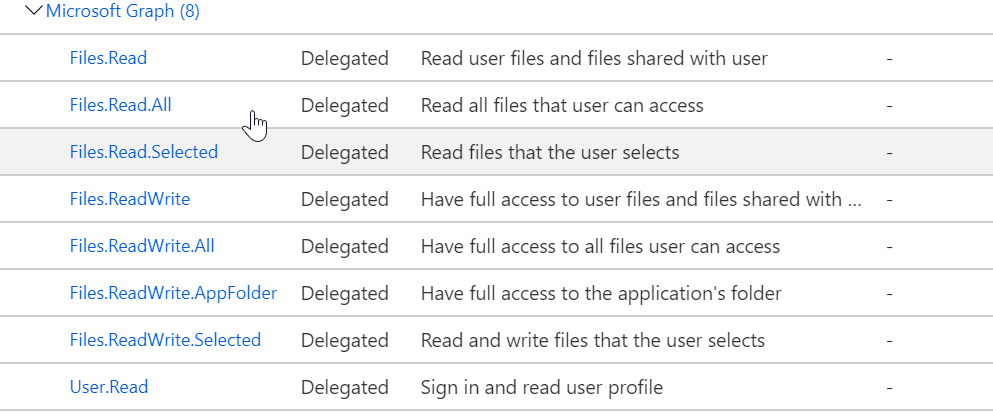 这里引用一个官方作者的gif说明,说的很清楚。 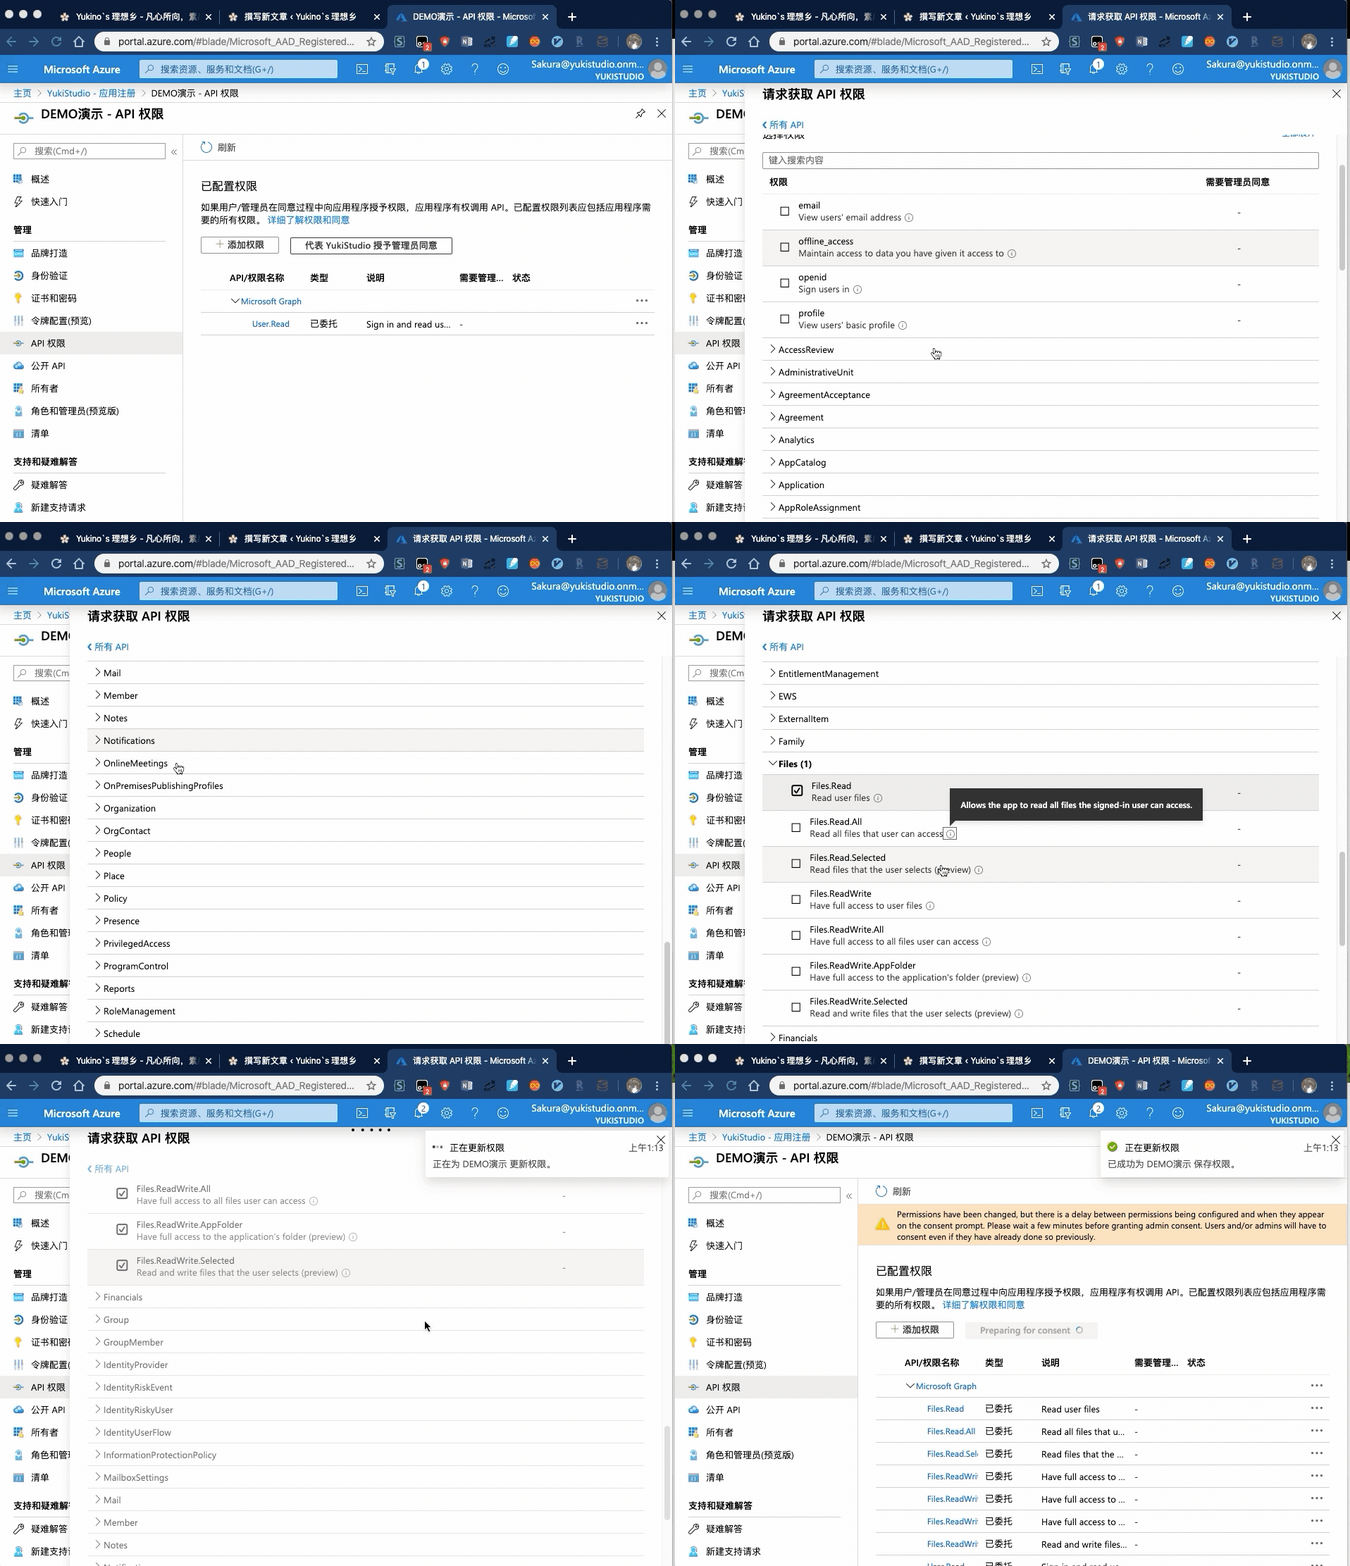 然后返回设置,选择证书和密码,添加客户端密码 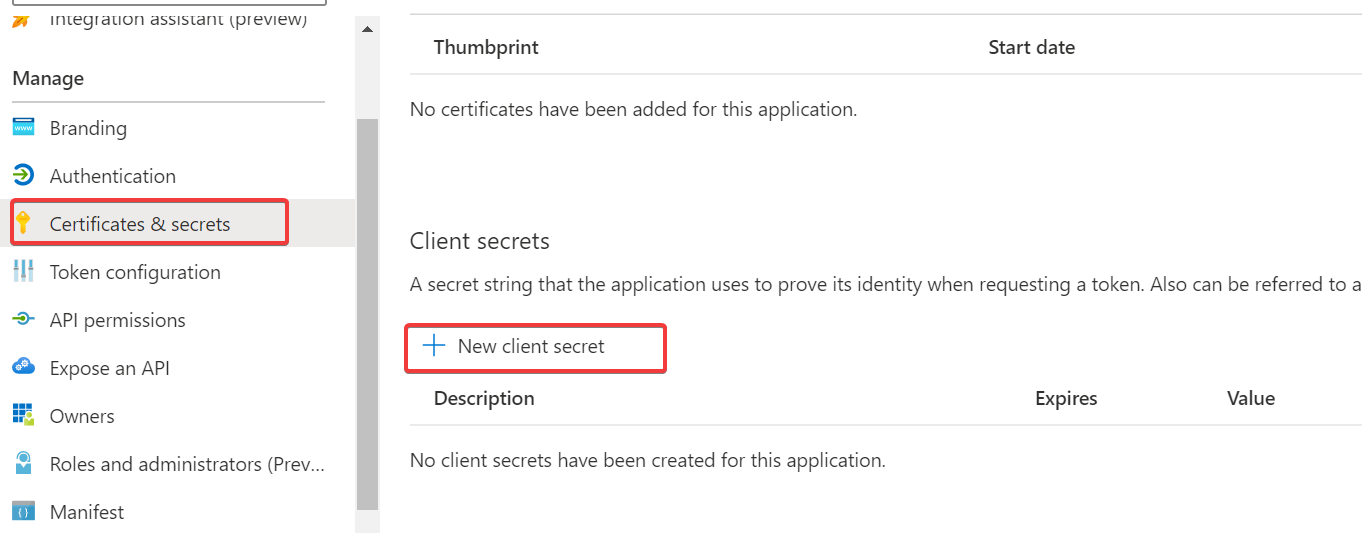 之后把这个密码记下来,这个ID就是**client_secret** 回到概述里面查找APPID,这个就是**client_id**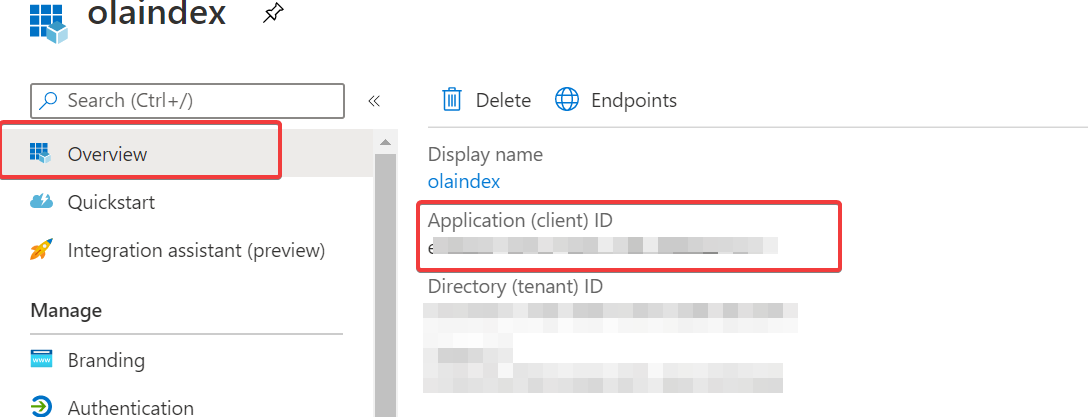 回到Olaindex中,把两个id填写在下面的地址。 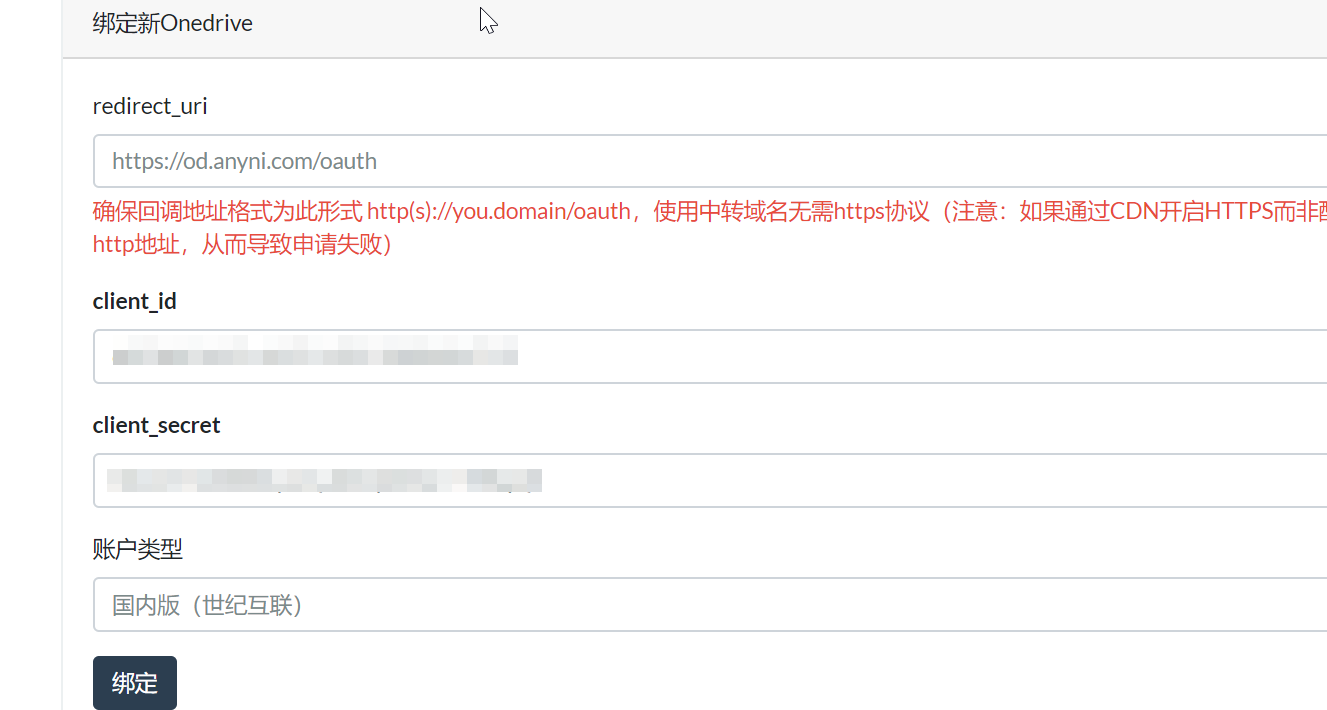 # 其他的onedrive程序 为什么选择olaindex呢,因为这个是整个界面上最好看的,看着最舒服的。另外其他的一些onedrive程序。 1.原版oneindex:开山鼻祖,使用的人较多,安装方便。但是界面不好看。 2.pyone:听说看片方便,有一键安装代码。 3.onelist:轻便简洁,不支持看视频和看图。另外该作者还有魔改版的oneindex,优化了图片分类。 4.olaindex:界面精美,API稳定,方便看图、看视频。**安装略显麻烦,我这里用的是olaindex的魔改版。** 5.cuteone:听说功能多,但我没用过。 6.其他oneindex修改版:各种修改版其实挺多的,建议自己寻找合适的。 # Olaindex 5.0版本 (2020.8.19更新)olainde在一直保持更新,但是目前主分支存在一些问题,但是5.0的分支是没有问题的。所以在git clone的时候加上 -b 5.0参数。另外,下面这个教程关于安装olaindex5.0挺不错的。 https://suyin-blog.club/2020/2VH10V0/ 引用参考: > https://www.moerats.com/archives/1006/ > https://imwnk.cn/archives/bt-olaindex > https://github.com/YukiCoco/OLAINDEX-Magic/blob/master/docs/install.md > https://www.fcall.cc/index.php/archives/78/ > https://567899.xyz/cn-onedrive-oneindex.html Last modification:September 11, 2020 © Allow specification reprint Like 如果觉得我的文章对你有用,请随意赞赏
2 comments
最后还关闭PHP的几个禁用函数:exec 、putenv 、 shell_exec 、 proc_open 、proc_get_statusaz
请问一下这一步是指将这几个函数禁用还是解禁?
解禁 原来是禁用的